Better Debug Python programs remotely in eclipse
Remote development of Python scripts on Raspberry Pi with Eclipse
This page describes how to install and configure Eclipse to develop Python scripts remotely on Raspberry Pi. Since no specific Raspberry features are used, these instructions can be used for any remote Python development with Eclipse. The only requirement is SSH server running on target.
Installation of Eclipse
Install Java Runtime Environment (JRE). 1.7 is recommended, but 1.6 should also be OK. If you have security concerns, do not install browser plug-in. JRE itself is not problematic. Download Eclipse for your OS from Eclipse download page. If you have have no special preferences, download Eclipse Standard. To install Eclipse, simply unzip the downloaded file to directory of your choice (there should be no spaces in path to this directory).
Installation of Eclipse plug-ins
Eclipse gets useful only when expanded with plug-ins. Some are included by default, but we have to add plug-ins for Python development and Remote Systems Explorer.
Pydev
- Run Eclipse by double clicking eclipse.exe in the Eclipse installation directory.
-
Select menu command Help Eclipse Marketplace. - In a dialog type search string ‘pydev’ and click go.
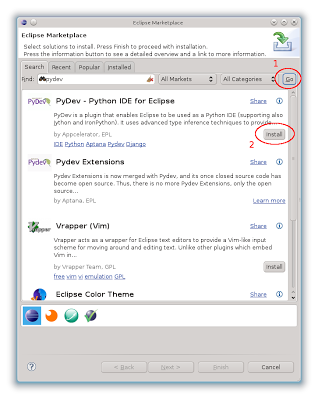
- Click Install button for Pydev plug-in.
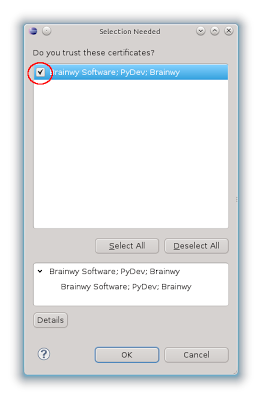
- Go through the installation dialogs, accept license, …, but be careful when Eclipse asks you during installation to trust Brainwy certificate. If you just click OK but do not check the checkbox, installation will not be done:
-
Click OK and finish installation of Pydev. Restart Eclipse when suggested.
**RSE - Remote Systems Explorer** -
This plug-in is not in Eclipse marketplace, but it is in the list of available sites. Select menu command Help Install new software, and –All Available Sites– in Work with field. - Type ‘remote’ as filter, then select RSE plug-ins as shown in the image below.
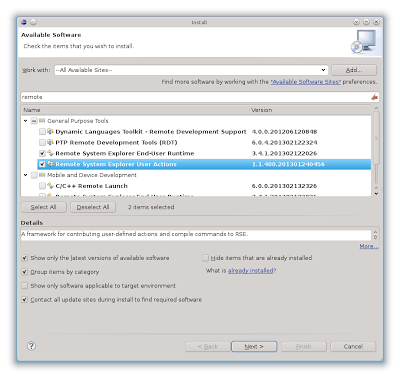
- Finish the installation and restart Eclipse.
Connect to Raspberry Pi
To make description clear, Raspberry Pi will be referenced as raspi in the following text, while computer running Eclipse will be referenced as PC.
Now it is time to turn raspi on - internet connection and power supply is all we need there. Keyboard or monitor are not needed on raspi, only on PC.
-
First make sure you can connect to raspi with other SSH client, for example command line client in Linux. If it does not work, make sure you have network access to raspi and that SSH server is running there.
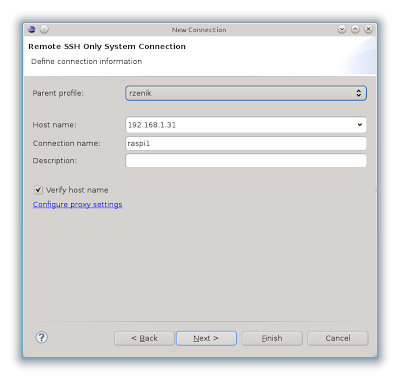
- Start Eclipse and open RSE (Remote Systems Explorer) perspective with menu command Window | Open Perspective | Other … | Remote Systems Explorer. Right click in Remote Systems view on the left and select New connection from context menu.
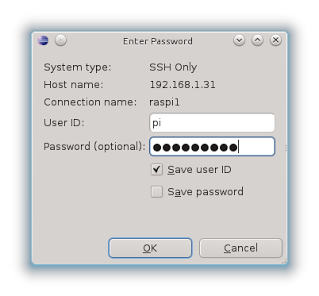
- Select SSH Only and click Next. Fill following dialogs as shown in the images below. Of course you have to use host name or IP of your raspi, as well as your user name and password.
- After the connection is established, you can see files on raspi in your Eclipse Remote Systems view, as shown in the image below. Create folder raspiproj and file test.py as shown in the image. Do not start it yet.
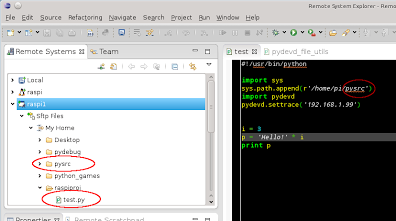
Program code (so that you can copy-paste it, and replace IP address of Eclipse host):
#!/usr/bin/python

import sys
sys.path.append(r'/home/pi/pysrc')
import pydevd
pydevd.settrace('192.168.1.99') # replace IP with address
                                # of Eclipse host machine


i = 3
p = 'Hello!' * i
print p
Open Remote Shell View
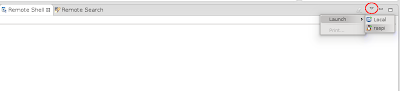
Remote Systems Explorer contains also a console view, which provides command line access to the target. 1. Open Remote Shell view in Eclipse (Windows | Show view | Other | Remote Systems | Remote Shell) 2. Clik on the Remote Shell View’s toolbar icon, as shown in the image below, and select connection to raspi.
Configure Raspberry Pi
Python is installed by default on Raspbian (recommended Linux distro). However, for remote debugging you have to copy some Pydev files from Eclipse installation to raspi and add few lines of code to your script. 1. Create Pydev project on PC with single py file (File | New | Project | Pydev | Pydev Project). Open the file and enter pydevd. With caret at the end of the word, press Ctrl+Space. Small window with proposals opens - select pydevd - pydevd.settrace(). Text should change to something like:
import sys;
sys.path.append(r'/home/marko/kepler/plugins/org.python.pydev_2.8.2.2013090511/pysrc')
import pydevd;pydevd.settrace()
- Open path given in call to append (in this example it is ‘/home/marko/kepler/plugins/org.python.pydev_2.8.2.2013090511/pysrc’) in file browser (Dolphin, Windows Explorer, …), and copy-paste directory pysrc to raspi as shown in the image of step 4 above.
- Create remote project by selecting directory raspiproj in Remote Systems view in Eclipse. Right click on it and select option Create Remote Project.
-
Open configuration file from raspi in Eclipse (double click on file in Remote Systems view):
~/pysrc/pydevd_file_utils.py
Edit this file to define translation of file paths on PC to file paths on raspi, as described in the file, for example:
PATHS_FROM_ECLIPSE_TO_PYTHON = [(‘/home/marko/proj/RemoteSystemsTempFiles/RASPI/home/pi/raspiproj/test.py’, ‘/home/pi/raspiproj/test.py’)]
Stepping through the code is possible also without this step, but you can’t set breakpoints. So this setting is quite important.
Try it
- Start debugger in Eclipse by clicking icon in Eclipse toolbar as shown in the image:

The button is visible only in Debug perspective (click the Debug button on the right).
-
Open Remote Shell view in Eclipse (Windows-Show view-Other-Remote Systems-Remote Shell), and start the script with command
python test.py
-
Debugger in Eclipse should activate:
blog comments powered by Disqus